
How to Set Up a Caregiving Bedroom That Actually Works

It’s 2 a.m. Someone needs the bathroom. The room is dark, the path is tight, and one missed step can turn a hard night into a trip to the ER.
A caregiving bedroom works when you set it up for safe movement, fast cleanup, and less strain on your body. That means clear walking space, bed access from the main transfer side, low-glare lighting, and supplies within reach. If incontinence is part of your night, tools like PeelAways can cut a bed change to under 60 seconds instead of 15–20 minutes, with 5–7 waterproof layers per set, sizes crib to king, and 28,000+ reviews at 4.8 stars.
Start here:
- Keep the bed easy to reach on at least one side
- Leave about 36 inches of clear path to the door or bathroom
- Remove rugs, cords, and small furniture from the walkway
- Add nightlights by the bed, doorway, and bathroom
- Keep wipes, gloves, pads, and bags within arm’s reach
- If wet beds are common, set up a layered bed system
Here’s what matters most when you want the room to work at 2 a.m., not just look fine at 2 p.m.
Transform Your Bedroom Safety with These Expert Tips
Why this is harder than people think
A bedroom can look normal in daylight and still be a problem at night.
That’s the part I didn’t get until I was the one half-awake, trying to help someone stand without tripping over a basket or hunting for wipes in the dark.
A few facts make this plain:
- 67.1% of caregivers of older adults report moderate to severe caregiver burden
- The bedroom accounts for about 25% of at-home falls that lead to an ER visit for adults 65+
- For adults 85+, that climbs to 31.6%
So the room has to do more than hold a bed.
It has to help you:
- move safely
- reach the bed fast
- clean up with less lifting
- keep the person you love feeling like a person, not a task
That’s why small room changes matter so much. A moved chair. A plugged-in nightlight. A covered hamper in the right spot. A bed that isn’t shoved against the wall.
What to look for before you buy anything
Before you spend money, fix the layout first.
I’d check these five things:
- Bed access: Can you help from the main side without leaning or twisting?
- Walking path: Is there a clear route from bed to bathroom?
- Mattress height: Can they sit with feet flat on the floor?
- Lighting: Can the path be seen without flipping on bright overhead lights?
- Supply reach: Can you grab what you need with one hand?
If those five are off, no product will save the night.
If they’re set up well, the right add-ons help a lot more.
Clear floor space and bed placement
This is where I’d start first.
If possible, leave 36 inches of open space on the main transfer side of the bed and along the path to the door or bathroom. If you use a lift, you may need 4–5 feet on one side.
If the room is small:
- keep the head of the bed against the wall
- leave the main side open
- avoid blocking door swings or closet access
For bed height, aim for this:
- feet flat on the floor
- knees near a 90-degree bend
For many people, that means about 20–23 inches from the floor to the top of the mattress.
Too low makes standing harder.
Too high can cause sliding when they try to get up.
Night lighting that helps, not hurts
At night, harsh light can make things worse.
A dark room into a bright bathroom can throw off balance fast. I’d use warm, low-glare light instead.
Best spots for nightlights:
- next to the bed where feet touch down
- near the bedroom door
- at the bathroom entrance
Also keep:
- a bedside lamp that turns on without standing
- a flashlight on the nightstand
That setup helps you see the path without waking everyone all the way up.
Grab bars, rails, and transfer help
Once the path is clear, add support only where it helps most.
The main spots:
- beside the bed
- along the route to the bathroom
- next to the toilet
Useful tools can include:
- grab bars for steady hand support
- a transfer pole near the bed
- a sturdy chair with armrests for dressing or rest
- a bed assist rail if the mattress fits snugly and leaves no gap
I’d skip anything flimsy or decorative.
At 2 a.m., stable matters more than pretty.
A bedside commode for rough nights
If the bathroom is far, there are stairs, or urgency is a problem, a bedside commode can cut risk fast.
Place it:
- on the stronger transfer side
- within one or two steps of the bed
- at a slight angle for an easier pivot
Leave 24–30 inches around it if you may need to help.
And set a cleaning rhythm:
- empty morning and evening
- keep liners and absorbent pads nearby
- store supplies close, not across the room
sbb-itb-45288fe
The bed setup that saves the most work
If incontinence is part of your week, the bed setup matters as much as the room layout.
I’d build the bed in layers:
- waterproof mattress encasement
- fitted sheet or fitted disposable layer
- absorbent pad under the hips or lower torso
- backup supplies within reach
That setup protects the mattress and cuts down full sheet changes.
And if you’re washing bedding most days, this is where PeelAways stands out.
It feels less like a product pitch and more like something another tired person hands you and says, “Here. This made nights less awful.”
What it does:
- stacks 5–7 waterproof fitted layers on the bed
- lets you peel off the top layer after a leak
- leaves a clean layer already in place
- cuts bed changes to under 60 seconds instead of 15–20 minutes
If you already use diapers or incontinence pads, this kind of backup makes sense.
You can check the Amazon listing for PeelAways too.
And if you want more setup ideas, these are worth reading:
- PeelAways blog
- Incontinence care articles
Tagline: Making aging and caregiving easier, one bed at a time.
Bedside storage and cleanup flow
Night care falls apart when the room makes you search for things.
I’d keep one small supply zone near the bed with:
- gloves
- wipes
- barrier cream
- briefs or pads
- disposal bags
- spare sleepwear
- backup bed layers
- flashlight
A bedside caddy, slim cart, or small shelf all work.
Then split waste from laundry:
- covered hamper for washable items
- lidded trash can for disposables
That one change keeps the floor clearer and cleanup less chaotic.
Quick comparison
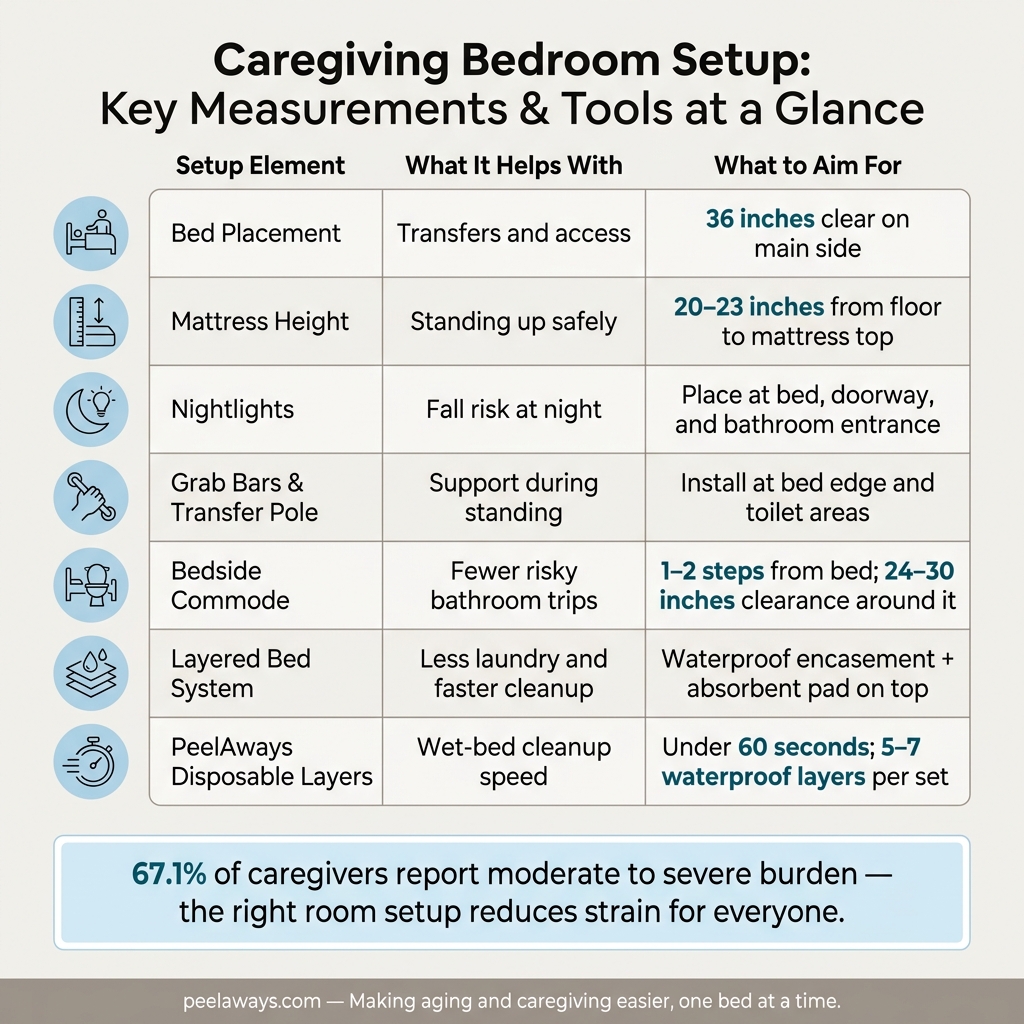
Caregiving Bedroom Setup Checklist: Key Measurements & Tools
| Setup piece | What it helps with | What to aim for |
|---|---|---|
| Bed placement | Transfers and access | 36 in. clear on main side |
| Mattress height | Standing up | 20–23 in. to top of mattress |
| Nightlights | Fall risk at night | Bed, doorway, bathroom |
| Grab bars/transfer pole | Support during standing | Place at bed and toilet areas |
| Bedside commode | Fewer risky bathroom trips | 1–2 steps from bed |
| Layered bed system | Less laundry and faster cleanup | Waterproof base + absorbent top layers |
| PeelAways | Wet-bed cleanup | 60 seconds, 5–7 layers |
FAQ
How much space should I leave next to the bed?
I’d aim for about 36 inches on the main side. If you use a lift, you may need 4–5 feet.
What’s the best bed height for an older adult or someone weak after surgery?
Usually the right height lets them sit with feet flat and knees near 90 degrees. For many beds, that lands around 20–23 inches from floor to mattress top.
Should I keep rugs in the room?
If you can, no. Loose rugs are a common trip risk. If one has to stay, tape the edges and use non-slip backing.
Are bed rails safe?
They can help with rolling and pushing up, but only if they fit the bed well and leave no trapping gap.
When does a bedside commode make sense?
When the bathroom is far away, there are stairs, or getting there in time is hard at night.
What helps most with nighttime wet-sheet changes?
A layered bed setup helps first. If leaks happen a lot, PeelAways is the one I’d look at for the bed itself
How to Arrange the Room for Safer Movement and Easier Care
It’s the middle of the night.
You hear movement before you’re fully awake.
Now you’re trying to help in a tight room, half in the dark, hoping nothing catches a foot or blocks the way.
That’s why bed placement comes first. It sets up access, transfers, and where every support tool goes. Once the room layout makes sense, the bed, lighting, and supplies stop working against you.
How to Position the Bed for Access, Transfers, and Nighttime Help
Stay close enough to help without leaning across furniture. Leave at least 36 inches of open space on the main transfer side and along the path to the door or bathroom. That gives room for a walker, wheelchair, or another person helping.
If the room allows, keep both sides of the bed open. That matters most when you need to help with turning, repositioning, or using a mechanical lift. A lift needs 4–5 feet of clear space on one side so you can roll it in and get it in place without a struggle.
In a small room, keep the headboard against the wall. Then place one long side a little closer to the wall, about 18–24 inches, while saving the full 36-inch clearance on the main transfer side.
Mattress height matters more than people think. The goal is simple: feet flat on the floor and knees bent close to 90 degrees. For most people, that means 20–23 inches from the floor to the top of the mattress. Too low, and standing takes more effort. Too high, and they can slide forward when trying to get up. Adjustable hospital beds make this easier. If the frame doesn’t adjust, lower-profile bases or mattress wedges can help.
One more thing that’s easy to miss: don’t let the bed sit in the swing path of a door or closet. A door that forces a bad angle during a transfer can turn into a mess fast at 2 a.m.
Remove Fall Hazards and Add Mobility Supports
Once the bed is in the right spot, clear the route. Then add only the supports that help during the transfer itself.
Start with the floor. Remove throw rugs completely if you can. If a rug has to stay, use non-slip backing and tape down the edges. Run electrical cords for lamps, monitors, or oxygen equipment along the walls with cord clips so nothing cuts across the walking path. Move out low benches, decorative ottomans, and small pieces of furniture that crowd the space between the bed and the bathroom.
Then do a test that tells you the truth fast: dim the room to nightlight level and walk the path yourself. What looks fine in daylight can feel like an obstacle course in the dark.
After the path is clear, add support where the person changes position.
- Grab bars near the bed-to-bathroom route and beside the toilet give them something steady to hold at the moments falls are most likely.
- A freestanding transfer pole near the bed edge gives a straight-up grip for standing. It’s handy in rentals or anywhere you can’t drill into the wall.
- A sturdy chair with armrests, set just outside the main walking path, gives them a place to sit while dressing or to rest after walking.
That chair should be the right height too. Feet flat. Knees at 90 degrees.
For the bed, bed rails or assist bars attached to the frame can help with rolling, repositioning, and pushing up to sit. Just make sure the mattress fits snugly against the rail so there aren’t gaps that could trap part of the body.
When to Add a Commode, Bed Alarm, or Monitor
Even with a clear path, some nighttime trips still feel shaky. That’s when backup tools can take some pressure off.
A bedside commode makes sense when the bathroom is far away, there are stairs, or nighttime urgency makes getting to the toilet in time hard. Put the commode on the person’s stronger or main transfer side, within one or two steps of the bed. Angle it a bit so they can pivot from the bed to the commode without a lot of twisting. Leave at least 24–30 inches around it so you can help from the side or behind. Commode liners with absorbent pads make cleanup easier. It also helps to stick to a routine for emptying and cleaning it every morning and evening.
Bed alarms, door alarms, and audio/video monitors can help most when someone has a high fall risk, nighttime confusion, dementia, or a habit of getting up alone when they need help. A bed exit alarm - whether it uses a pressure pad, motion sensor, or under-mattress sensor - lets you know when the person starts to sit up or stand. That small bit of warning can give you time to get there before a fall.
Try to use a quiet bedside alert instead of a loud alarm. Loud alarms can startle people and make the whole night harder. If you use a monitor camera, point it at the bed and main walking path, not the whole room. Keep the audio low enough that you can hear what matters without waking everyone else.
And if you can, explain these tools to the person you’re helping. Call them what they are: safety tools, not a way to watch them. That small bit of respect goes a long way when someone already feels exposed during rushed nighttime trips.
How to Set Up the Bed for Faster Changes and Better Incontinence Care
It's 2:00 a.m. again. The bed is wet, the room is dim, and you're trying to fix everything fast without waking your loved one any more than you have to.
A good caregiving bed setup cuts down the mess, keeps the mattress dry, and saves your back when accidents happen in the middle of the night. The goal is simple: less stripping, less laundry, and less disruption for both of you.
Build a Layered Bed Setup That Protects the Mattress and Saves Time
Start at the bottom, with the mattress itself. A fully waterproof mattress encasement should wrap the whole mattress and stay on all the time. Think of it as your last line of defense if every layer above it fails.
On top of that goes your fitted sheet or disposable fitted layer. Then place an absorbent pad under the hips or lower torso, where leaks usually happen.
That one pad can make a rough night a lot easier. When there's an accident, you change the pad instead of tearing apart the whole bed. That's not a small thing. Caregiver research reports that 71% of caregivers say incontinence hurts the home through damage to carpets, beds, and chairs, plus more laundry. Other caregivers say they're washing bedding on most days, which turns laundry into one of the hardest parts of the job.
And there’s another part people don’t talk about enough. A faster change means less waiting in a wet bed. Less skin exposure. Less shame for the person you’re caring for.
Keep your setup simple and close by. Have the basics within reach so you’re not leaving the room in the middle of cleanup:
- gloves
- wipes
- disposal bags
- spare sleepwear
- backup sheets or pads
That’s why a layered bed works so well. You change the top layer, not the whole bed.
How PeelAways Makes 60-Second Bed Changes Possible
A full bed change the old way can take 15 to 20 minutes - pulling everything off, fighting fitted corners, and remaking the bed while someone waits there uncomfortable and exposed. In the middle of the night, that can feel endless.
PeelAways multi-layer disposable sheets go at this problem head-on. Each pack stacks 5 to 7 waterproof fitted layers right on the mattress. When the top layer gets wet or soiled, you peel it from the corner, fold it inward, and throw it away. There’s already a clean, dry layer underneath, ready in under 60 seconds. No lifting. No wrestling the mattress. No late-night laundry pile.
I like that it solves the part of caregiving that wears you down little by little. Not the big dramatic moments. The repeat moments. The soaked sheets. The heavy remake. The "I can't do this again tonight" feeling.
If you already use diapers or incontinence pads, this kind of setup makes a lot of sense. PeelAways comes in sizes from crib to king, and it’s earned 28,000+ reviews with a 4.8-star rating. It’s one of those things many people only wish they had found sooner.
You can see the product at peelaways.com/shop, check the Amazon listing for PeelAways, or read more on the PeelAways blog, like Making aging and caregiving easier, one bed at a time and other incontinence care articles on peelaways.com.
Once the bed changes fast, the next piece is keeping light, supplies, and cleanup tools right where you need them.
Lighting, Storage, and Laundry Systems That Make Nighttime Caregiving Easier
It’s 2am. You’re trying not to wake anyone more than you have to, but the room is dark, the wipes are missing, and now you’re hunting for a trash bag with one hand. That’s the part people don’t talk about enough. Night care isn’t just hard because of the cleanup. It’s hard because the room itself can work against you.
Once the bed is ready, the next step is making the room work after dark.
Light, supplies, and waste placement shape how fast and safe overnight care feels. Set them up ahead of time, and an overnight accident feels less like chaos and more like a job you can get through.
Choose Nightlights and Bedside Lighting That Support Safe Overnight Care
Use a clear, low-glare path of light from bed to bathroom; avoid harsh overhead light.
Motion-sensor nightlights or plug-in path lights work well here. Put one beside the bed where feet hit the floor first, one near the bedroom doorway, and one at the bathroom entrance. Research connects brighter path lighting with fewer falls, and targeted nighttime lighting has also cut falls in care settings.
The National Institute on Aging says to keep light switches or nightlights close to the bed and a flashlight on the nightstand in case the power goes out. Stick with warm, low-glare bulbs along the path. One common setup causes trouble fast: a dark bedroom leading into a painfully bright bathroom. That sharp contrast can throw a person off and increase fall risk.
At least one light source should be reachable from bed without standing. A touch lamp works. So does a lamp with a big, easy-to-find switch.
Once the path is easy to see, the next job is making sure the supplies are just as easy to grab.
Set Up a Bedside Caddy and Supply Zone for One-Reach Care
A bedside caddy keeps cleanup supplies within arm’s reach.
A hanging fabric caddy clipped to the bed frame, a slim rolling cart, or a small shelf with labeled baskets can all do the job. Group items by use so you’re not digging around half-awake:
- Top: gloves and wipes
- Middle: barrier cream and briefs
- Bottom: flashlight, disposal bags, and backup pads
Keep the zone small. Store extra supplies in a closet or separate bin instead of piling everything onto the nightstand. Glasses, a phone charger, and a water bottle should stay on the easiest-to-reach surface so they don’t disappear under care items.
That part matters more than it sounds. When the room feels organized instead of medical, it helps protect a sense of normal life and dignity for the person receiving care.
Then it helps to split up what gets washed from what gets thrown away.
Build a Laundry and Waste Routine That Prevents Backups
Two separate collection points - one for washable items, one for disposables - keep soiled materials contained and the room easier to manage.
Use a covered hamper with an inner liner bag for soiled clothing and reusable pads. Keep it out of the walking path so it doesn’t turn into one more thing to trip over.
Right beside the bed, keep a lidded, lined trash can for disposable items like used gloves, wipes, and peeled-away bed layers. The lid helps with odor and keeps the room looking neat. It should open easily with one hand and be small enough to empty without a struggle.
A simple daily rhythm helps a lot:
- Empty the trash
- Start laundry if needed
- Restock the caddy
Professional caregiver training materials are direct about this: soiled laundry should never sit on surfaces or floors. It should go straight into a covered hamper, and the hamper itself should be disinfected between uses. Once a month, do a quick check of the supply zone for expired items, dirty containers, and low stock.
Final Bedroom Setup Checklist to Reduce Strain and Preserve Dignity
It’s late. The room looks fine at first glance, but at 2 a.m., “fine” can fall apart fast. One cord, one missing wipe, one dark hallway - and suddenly a hard night gets harder.
Before the first night, do one last 10-minute scan of the room. Focus on four areas: safe movement, bed access, lighting, and supplies and cleanup.
- Safe movement: Make sure the path from bed to bathroom is at least 36 inches wide, with no loose rugs, cords, or furniture in the way. The bedroom makes up about 25% of at-home falls that lead to a U.S. emergency department visit for adults 65 and older, and that climbs to 31.6% for adults 85 and older.
- Bed access: When your loved one sits on the edge of the bed, both feet should rest flat on the floor. Leave clear space on at least one side for a walker, wheelchair, or lift.
- Lighting: Set up a nightlight or path light from the bed to the bathroom. The bedside lamp should turn on without anyone needing to get out of bed.
- Supplies and cleanup: Keep gloves, wipes, incontinence pads, and spare sheets within one or two steps of the bed. Put a covered trash can and hamper close by. Problems that seem small during the day can turn into a mess in the middle of the night.
Once the room passes the checklist, keep it calm, clear, and still feeling like a bedroom. Tuck supplies into baskets or drawers so the space doesn’t feel like a supply closet. Leave comforting things in sight - photos, a favorite blanket, a book on the nightstand. Those little touches matter more than people think.
Wipe down high-touch spots every day: bed rails, grab bars, remote controls, and door handles. Change sheets and pads every morning and after any overnight accident. Then do a quick reset. Empty the trash. Start the laundry if you need to. Refill the caddy. It doesn’t take long, and it keeps one rough night from snowballing into a rough week.
For overnight comfort, keep the room around 68 to 72°F and use breathable layers.
Next Step: Build Your Caregiving Bed Setup With PeelAways
If wet-sheet changes are still the part you dread most, this is where PeelAways can help. I’m talking about the kind of moment every exhausted caregiver knows: the bed is wet, your loved one is tired and embarrassed, and you’re standing there knowing a full sheet change could take 15 to 20 minutes.
PeelAways cuts that down to under 60 seconds.
Start with a waterproof mattress protector. Then put PeelAways on as the main fitted sheet. Each set includes 5 to 7 waterproof layers stacked right on the mattress. When the top layer gets soiled, you peel it away and the next clean layer is already in place. No lifting the mattress. No fighting a soaked fitted sheet at 2 a.m.
It’s one of those things I wish I’d found sooner. Less laundry. Less strain on your back. More dignity for the person in the bed.
PeelAways has 28,000+ reviews and a 4.8-star rating, with sizes from crib to king. If you use diapers or incontinence pads, it fits right into that routine. You can shop PeelAways on peelaways.com/shop or on Amazon. For more help with setup and overnight care, you can also read other guides on peelaways.com, including articles like this one and this one.
Making aging and caregiving easier, one bed at a time.
Blog readers save 10% with code BLOGS10 at checkout. Available on peelaways.com and Amazon. Free shipping on orders over $100.
Comments
0



SAVE MONEY & WATER
Professionals & Institutions save a fortune on labor/laundry.

SUPERIOR COMFORT
The first thing our customers notice is how soft our sheets are.

100% WATERPROOF
Each layer is 100% Waterproof, perfect for spills and accidents

SAVE TIME
Change the sheet in under 1 minute without stripping the bed.

Leave a comment